Master subtasks in Backlog for optimal task organization

Brandi Gratis
February 16, 2021
Depending on the size of your project, tasks in Backlog can start to get out of control if you don’t decide how you’re going to group and organize them. With task detail options like due dates and assignees, plus fields like milestones and versions, you’re off to a good start. But there’s a powerful organizational tool that many Backlog users fail to take advantage of: subtasks.
By introducing this simple hierarchy to your tasks, you can keep related tasks sorted together and your entire project more organized.
Here’s a quick tutorial to help you master subtasks in Backlog.
*The subtask feature is only available on paid plans.
What are subtasks?
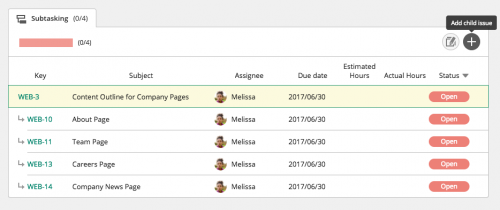
In Backlog, the subtasking hierarchy is made up of “parent issues” and “child issues.” You can assign as many smaller child issues to a parent issue as you’d like.
Keeping smaller tasks under one parent issue allows for:
– Easier tracking of task delegation and progress,
– Simpler overviews of related issues, and ultimately
– Smoother management of large projects.
Breaking down tasks into smaller parts also makes it easier to assign particular parts of a task to different people and track those parts independently.
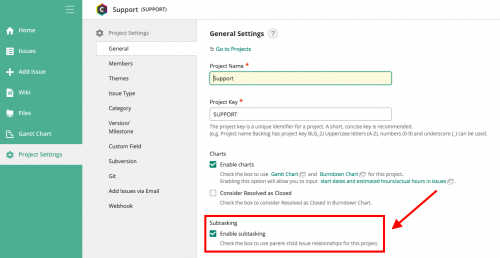
Note: To begin using the subtasking feature for a project, the Project Administrator needs to check the “Enable subtasking” box on the Project Settings page.
Creating subtasks
There are several methods for linking issues together: creating new issues and connecting existing ones. We’ll walk you through each option.
Adding a new issue as a child issue
There are two ways to add a new issue as a child issue.
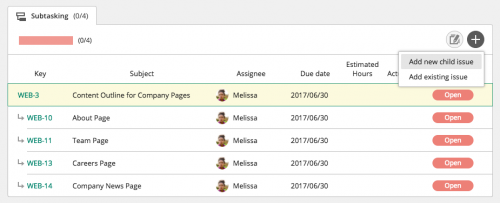
1. From the Issue page
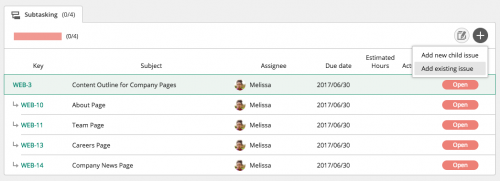
- Select the “Add child issue” icon in the subtasking section of the Issue page.
- Click “Add new child issue.”
- Fill out the details of your new issue.
- And save.
The issue added will become a child issue to the original issue.
Note: If the issue is a child issue itself, the new issue will be a child issue to the same parent issue.
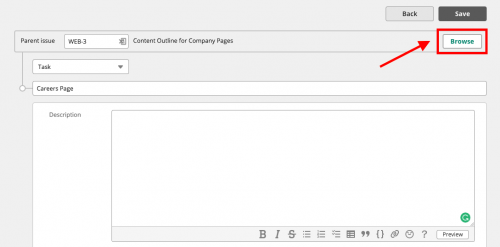
2. From the Add Issue page
- Select the “Browse” button next to the “Parent issue” box.
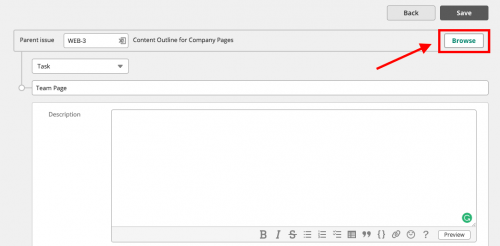
- Search for and select the appropriate issue you would like to designate as the parent issue.
- And save.
That issue will now appear as a child issue to the parent issue you selected.
Note: The parent issue must be in the same project.
Assigning an existing issue as a child issue
There are two ways of setting an existing issue as a child issue.
1. From the Issue page
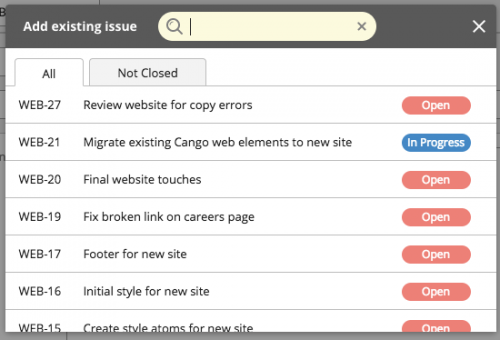
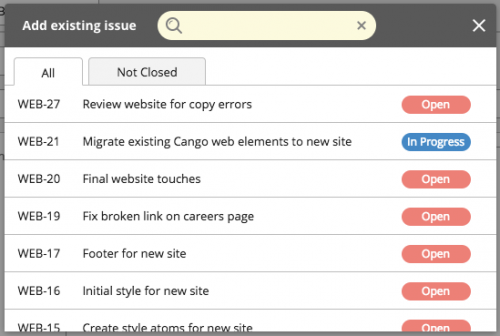
- Select the “Add child issue” icon, and click “Add existing issue.”
- Search for and select the appropriate issue you would like to add as a child issue.

The selected issue will be added to the Subtasking section of the parent issue page you selected.
Note: If the issue is a child issue itself, the new issue will be a child issue for the same parent issue.
2. From the Edit issue page
- Open the Edit issue page by selecting the “Edit” icon in the upper-right-hand corner.
- Select the “Browse” button next to the “Parent issue” box.
- Search for and select the appropriate issue you would like to designate as the parent issue.
- And save.
That issue will now appear as a child issue to the parent issue you selected.
Note: The parent issue must be in the same project.
Assigning/Removing a parent issue
A parent issue can be assigned or removed by editing an issue.
From the Issue page,
- Select the “Edit” icon in the upper-right-hand corner.
- Select the “Browse” button next to the “Parent issue” box.
- Search for and select the appropriate issue you would like to designate as the parent issue OR delete the parent issue key.
- And save.
Your child issue will be added to or removed from its parent issue, depending on your selection.
Remember: The parent issue must be in the same project.
Closing a parent issue
When you change a parent issue’s status to “closed,” a dialog box will appear asking whether you want to close all issues contained in that parent issue or just the parent issue itself.
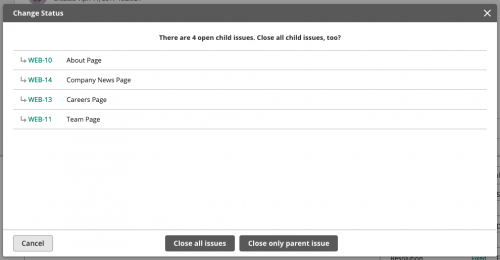
After selecting “Close all issues,” the statuses of all child issues will also be changed to “closed.”
When you select “Close only parent issue,” only the parent issue’s status will change to “closed.” All other child issues and their statuses will remain the same.
Subtasks vs child issues
For many, these two terms can get a bit confusing. A simple explanation is that a subtask is to a task what a child issue is to a parent issue. But, with <parent> <child> issues, you can also include an overarching <epic>.
When it comes to your subtask types, you can categorize a subtask as a child issue. This, however, does not work in reverse.
Subtasks in Backlog
Subtasking is useful and often under-utilized. Adding a simple hierarchy to a set of tasks helps your team remember how everything fits together, and it helps you track them together.
This post was originally published on May 30, 2017, and updated most recently on February 16, 2021.

